Have you accidentally deleted HFS+ partitions on Mac ? Are you looking for a solution to recover deleted HFS+ partitions in Mac OSX 10.6 snow leopard ? If yes then your are at the right place , here you will get complete description about how to restore deleted HFS+ partitions in Mac OSX. In Mac system if the internal partitions gets corrupted then in this situation 99% chance is to lost your Mac files. Separating a single physical hard drive into physical hard drive in to multiple spaces enabling you to arrange your files to your liking. So you have to always keep an updated back up files of your data . Data or partitions gets deleted due to some of the various reasons and some of the possible reasons are listed below
 |  |
Reasons behind corruption of HFS+ partitions
- Due to operating system crashes
- Formatting or reformatting of hard drives
- External devices error
- Due to accidental deletion of the partitions
- Due to improper shut down of the system
and so on. These are the some common factors due to which you were losing your important data or HFS+ partitions. But don't panic , there is an option from which you can easily restore deleted data or Mac partitions. With the help of Mac Data recovery software you can restore all your deleted Mac files easy and in effective manner. With data it can also recover videos, audios, images, text documents and many more. It can provides you deep scanning algorithm to scan your system deeply and then it start recovering your deleted partitions effectively.
Features of Mac Data Recovery Software
- Restore all the types of files easily
- Supports various file format to restore deleted data
- Provides you attractive and graphical user interface
- Comes with demo versions and preview options
- Supports all the Mac version such as lion, panther, leopard and so on
User Guide : Mac Data Recovery Software
Step 1: Firstly Launch up the Software
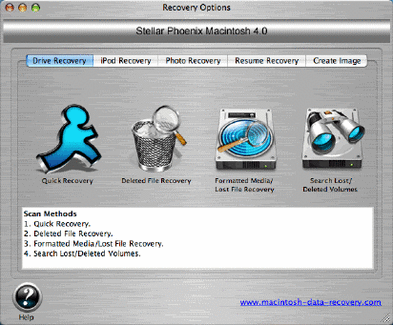
Step 2: W select the recovery drives from the main screen and then select the volume for the recovery

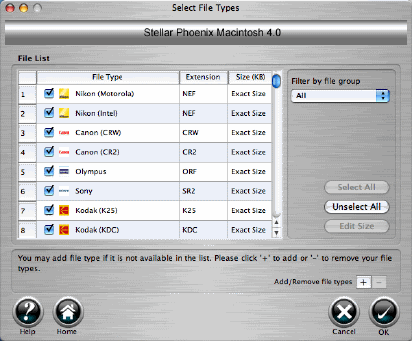
Step 3: Now you need to select the type of the files
Step 4: Now start the process of scanning
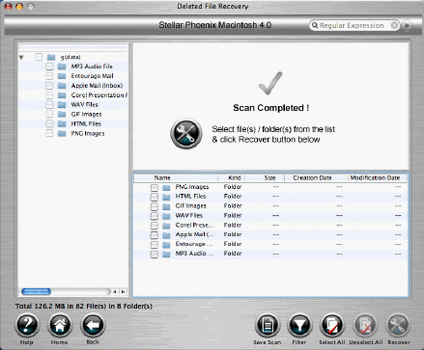
Step 5: After the completion of the scanning process the application will recover all the deleted files also from trash. And then after you can save you files at their specified location.
 |  |


 RSS Feed
