
Hard Drive is the most integral part of any computer system. Every kind of data as well as the Operating system is installed on the hard drive. Although it is quite a rare case but what if your hard drive crashes or fails to respond. All your stored data will be inaccessible and in danger of being lost. There are two types of failure one is physical failure and other is logical failure. Here we will discuss about logical failure and how to restore data from logically failed hard drive as you can not deal physical failure by yourself. The Mac hard drive is divided in to different logical drives called volume. The size of these partitions can be adjusted by re partitioning. It is recommended that you deal with partitioning issue with Mac disk utility other wise there are chances of corruption which may lead to logical failure of Mac hard drive.

|

|
When any type of logical failure occurs then the system's BIOS will not recognize the the hard drive and it will not find any startup disk so the system will not boot up. There are various reasons of Logical failure such as :-
The logical failure of Mac hard drive is a kind of panic situation for any user as he may think that all his important data has been lost. But this is not the case the data can be recovered from a logically failed drive as it has not been physically damaged and the data still remain intact on the hard drive. If you have the backup of the data you have lost then well and good else you need torecover data from logically failed Mac hard drive.
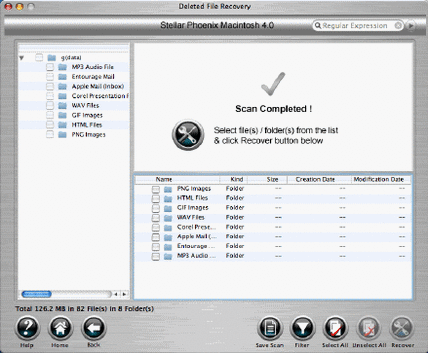
For performing the recovery process you need an another Mac system that is working perfectly. Now you can install the Mac data recovery software in it and attach the logically failed hard drive to that system. The software will treat it as an external drive and then scan it for the data in it, you can now see the preview of all the data it can recover. Just select them to be recovered at the location of your choice. The software is quite easy to handle and you will not require any specific technical skill for that. Just download it and retrieve data from logically failed Mac hard drive.
- MBR failure – Master Boot Record contains the information regarding the initial boot up and stored in the first sector of the drive.. So if this file is corrupted or is inaccessible then the system will not boot.
- Operating system error – If any registry file or system file is deleted or dislocated then it will lead to operating system crash and you will not able to access the data of the hard drive.
- Virus attack – If there is a severe virus infection to the Mac then it can corrupt all the file and the file system of the hard drive.
- Improper Shutdown – If the Mac system is improperly shut down by the user or because of the power failure or surge then the logical drives can get affected.
The logical failure of Mac hard drive is a kind of panic situation for any user as he may think that all his important data has been lost. But this is not the case the data can be recovered from a logically failed drive as it has not been physically damaged and the data still remain intact on the hard drive. If you have the backup of the data you have lost then well and good else you need torecover data from logically failed Mac hard drive.
For performing the recovery process you need an another Mac system that is working perfectly. Now you can install the Mac data recovery software in it and attach the logically failed hard drive to that system. The software will treat it as an external drive and then scan it for the data in it, you can now see the preview of all the data it can recover. Just select them to be recovered at the location of your choice. The software is quite easy to handle and you will not require any specific technical skill for that. Just download it and retrieve data from logically failed Mac hard drive.
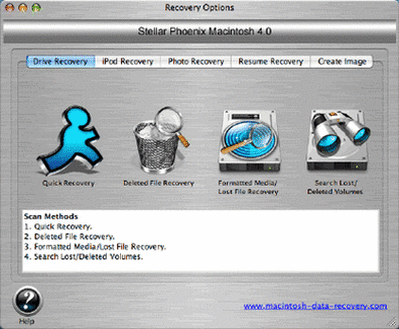
User Guide to Recover Data from Logically failed Hard drive
Step 1 : Install Mac data recovery software and run on Mac.
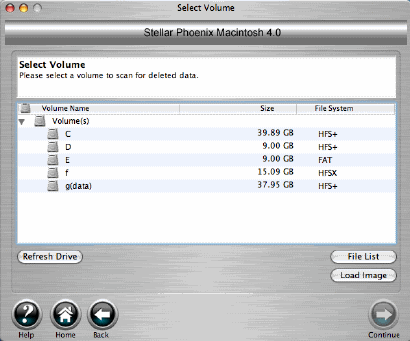
Step 2 : Choose the logically failed drive for scanning.
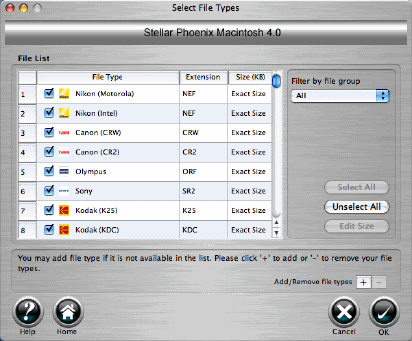
Step 3 : Select the file types of the file you want to recover.
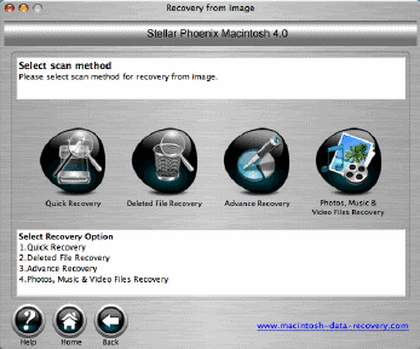
Step 4 : Choose the scanning mode and start scanning.
Step 5 : When the scan is complete you can select the location where files will be saved.
|
|
|
 RSS Feed